Print Custom Labels
The Print Custom Labels form is only functional when interfaced with Retail’s custom label program. Labels are created in BarTender© by Seagull©.
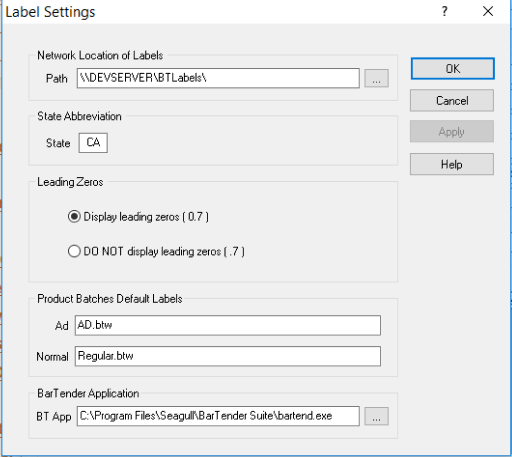
1. Begin by pressing the Settings button. If necessary, change the name of the label path by editing the Network Location of Labels. This is the name of the Back End that has the custom label program installed. This should be in the format: \\MYCOMPUTER\BTLabels\. “MYCOMPUTER” should be changed to the name of your computer as seen on the network. “BTLabels” is the default name of the shared Label folder in the Retail Back End.
2. Enter the State Abbreviation. This will be used for items with a redemption value.
3. Select either Display Leading Zeros (0.50) or DO NOT Display Leading Zeros (.50)Display_Leading_ZerosDo_NOT_Display_Leading_Zeros. This will affect the way the prices are printed on the labels.
4. Press Apply to save your changes, and then press OK to close the Settings form.
5. In the Print Labels form, select the Label NameLabel_Name from the drop-down. These are the labels you created in BarTender.
6. Make the appropriate selections from Select ProductsSelect_Products section of the form. If selecting a batch, press the Reg Batch/Ad Batch toggle button. When "Reg Batch" is displayed on the button, only regular price change batches will be displayed in the drop down, and if Ad Batch is displayed, only ad batches will show up in the drop-down. To create labels for an existing Ad or Normal Price Change batch, select a Batch Name Batch_Namefrom the drop-down.
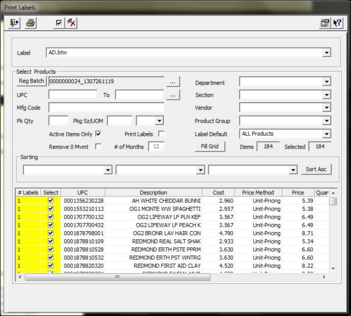
You can select from the following fields if you wish to filter the products, or to print labels without using a batch:
- To select products by UPCSelect_UPC_for_labels, enter either one UPC or a range of UPCs.
- To select products by Manufacturer CodeManufacturer_Code, enter the code and press Tab or Enter. The code is usually the first 5 digits after the leading zeros. Press Enter or Tab, and the UPCs will be entered in the UPC fields above.
- To select or filter products by Pack Quantity7T471Z, enter the quantity in the pack and press Tab or Enter. For example, a 6-pack of soft drinks, enter 6.
- Enter the Package Size and Unit of MeasureJFXNUM to filter by these fields. For example, for products weighing 12 oz, enter '12' and select 'OZ' from the drop-down.
- To print shelf tags only for items that are flagged Active in Product Maintenance, flag Active Items Only2AOCZHK. This will prevent labels being printed for items that you might not sell in your store, for example, items that came down in a batch from Host Maintenance or Enterprise.
- Check the Print LabelsPrint_Labels_1 field to make labels for all the products with the print label field flagged in Product Maintenance. This can also be used as a filter, for example, by selecting a department name and the Print Labels field.
- If you do not wish to print shelf tags for items that have had no sales for a while, flag Remove 0 Movement for # of Months59UL_GQ167Q7V8.
- To print labels for a DepartmentDepartment_4, select the department name from the drop-down. Additional criteria may be selected at the same time, such as Vendor.
- To print labels for a SectionSection_4, select the section name from the drop-down. Additional criteria may be selected at the same time, such as Vendor.
- To print labels for a VendorVendor_4, select the vendor name from the drop-down. Additional criteria may be selected at the same time, such as Section.
- To print labels for a Product GroupProduct_Group_2, select the name or number of the group from the drop-down.
- NOTE: You can choose several different criteria at one time, for example, Batch Name, Department, and UPC range. Press the Execute button after making your selections. The items displayed in the grid will be those matching your criteria.
8. Select the Label Default1806VF9 from the drop-down. This defaults to All Products. If you have assigned default labels to your products in Product Maintenance, you may want to change your selection here.
9. When you have finished making your selections, press the FILL GRID button. The products meeting the criteria will be displayed in the grid.
10. Use the SortingSorting_fields drop-downs to display and print the products according to several options. For example, you can sort by Department and Description. Press the Sort Ascending button to sort the items. Press again to toggle from Ascending to Descending.
11. If you want to print more than one label, click on the field in the grid that you want to edit in the # LabelsNumber_of_Labels column and type in the number you want to print. The number in this field defaults to that set for the item in Product Maintenance. For some items you may need several shelf tags printed.
12. You can SelectSelect_Items_for_Printing which items you want labels printed for. By default, all items in the grid are selected for printing. To prevent a label from being printed for an item, check in the box next to the UPC to remove the check mark. Press "Select" in the grid to remove the check mark from all of the items.

13. When you have finished with your selections, press the Print button in the toolbar. The BarTender program will open up with your labels ready for printing.