Add New Batch
To create a new batch, press the Add a New Batch Button in the toolbar.
- The Create New Batch form opens up.
- Select the Batch Type from the drop down.
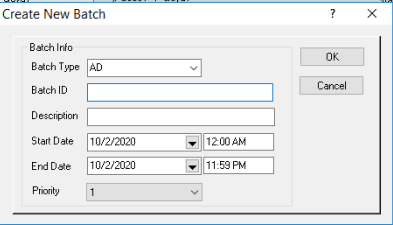
- AD batch to create a temporary sale batch.
- Normal Price Change to apply permanent price changes.
- Pull Shelf Tags to create shelf labels for use when the batch has or is about to expire.
- Use the Batch ID field to assign a Batch ID that is easy to remember. For example, use the date for when the pricing change goes into effect. You can also indicate:
- Price Updates. For example 010321PU could indicate the batch product updates will go into effect January 3, 2021.
- Product Batch. For example, 010321PB could indicate the batch product pricing has been edited and will go into effect January 3, 2021.
Note: Do not include an apostrophe in the batch name.
- Enter the Batch Description.
- Enter the Start and End Dates. If this is a Normal Price Change batch, only the start date will be available.