Product Batches Maintenance
The Product Batches Maintenance form allows you to create two different types of batches. The first allows you to group products for an Ad Batch: Temporary price reductions, such as a weekly ad. The second allows you to group products in a Normal Price Change Batch: Permanent price changes, to products that may require a price change to be effective on a particular day. Additionally, you may also print labels for a batch that has or is about to expire.
You may also apply Scale Item Batches, that are sent from Enterprise to Store. This is for use with Retail's integration to ePLUM or InterScale. See step #12 below.
- From the Point of Sale Menu, under Products, select the Product Batches Management task.
- To edit an existing batch, click on the Find Batch button in the toolbar. Select the Batch IDBatch_Id and double-click on the name.
- To create a new batch, either press the Add New Batch button in the toolbar, or enter the Batch ID in the Batch ID field and press enter. Retail will search for this batch, and if no batch by this name exists, you will be prompted to create a new one.
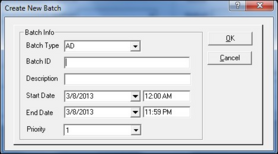
- The Create New Batch form opens. Begin by selecting the Batch Type: Ad, Normal, or Pull Shelf TagsBatch_Type_1. Enter the Start Date and End Date of the saleStart_DateEnd_Date. (If you select Normal Price Change, the end date will be disabled.) Enter the time of day for the Ad to begin and end, using the AM or PM mode. You may also print labels for batches that have or are about to expire by selecting Pull Shelf Tags. Pull_Shelf_Tags
- To enter a product to a batch, enter a product’s UPC or PLUUPC_Code_or_a_PLU_Code.
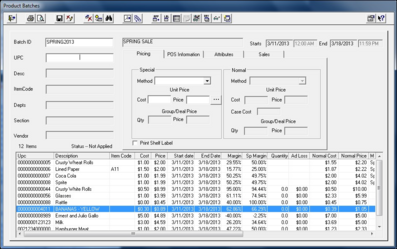
- The following tabs are available for editing or viewing:
- Pricing
- POS Information
- Attributes
- Sales
- Ad_Batch_Sales_tab
- To Edit a Product in an existing Batch, enter the Product’s UPC field or double click on the Product in the Product List Box. Apply changes and press the Save button in the toolbar. Repeat for each product you wish to change.
- To delete a Product from a batch, double click on the product in the product list and click on the Delete Record button in the tool bar. If you wish to delete an entire batch, click on the Delete Batch button in the tool bar. (Note: If the batch has already been applied to the products table the ad prices will still be in effect unless you delete the special pricing dates in the Product Maintenance task.)
- When you have finished with editing, click on the Print Labels button from the toolbar.
- Click on the Apply Batch ButtonApply_Batch in the toolbar to apply any modifications to the batch. This step may be performed any time prior to the expiration date for the Ad/Batch. Important: You must click the Apply button for the changes to apply to the Products file.
- Apply Batch Button: Clicking on this button will activate this batch. If you “apply” a batch that will be effective in the future, the batch is then scheduled to go into effect on the Start Date automatically. If the start date is the current date (or earlier), the price changes will be effective immediately. If two Product batches are applied for the same day, with the same products, the “Product Batches Maintenance” form will pop-up, allowing you to select a priority for the batch.
- If other batches are in effect for the same time period, the Product Batches Priority ManagementProduct_Batches_Management dialogue will pop up. From this screen you may set the priority for two or more batches that are running concurrently. For more information on Priority Levels for Batches see Batch Priority Management. Price_Management
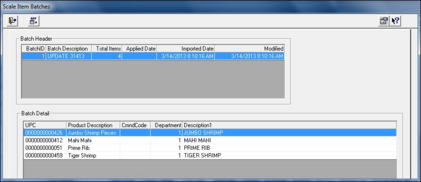
- To apply a Scale Item Batch that was exported from Enterprise, press the Scale Item Batch Maintenance button in the toolbar. When the form opens up, press the Apply button to apply the updates to the Products file. Then, synchronize the Scales.
Tips: You can analyze product movement for each product you have added to the Ad/Batch by double clicking on the product from the Ad/Batch list box and clicking on the Sales tab.
You can analyze Ad Loss DollarsAd_Loss_Dollars by clicking on the Ad Loss button in the toolbar. The calculation is the number of items sold at the sale price multiplied by the normal price, and subtracting the sale price. The frame displays from the start of the batch to the end of the batch, or if the batch has not expired, up until the last store close.
You can extend the dates for an existing Batch as long as the Batch has not expired, by clicking on the Search for Batch button in the toolbar. Double-click on the name of the batch to open. Press the Extend Date button in the toolbar.
Note: The Find a Batch button in the toolbar also displays batches created in Receive an Invoice and Mass Product Changes forms.
See Also: