Product Maintenance
The Product Maintenance form is used for adding new products and editing existing products in your product file.
To add a new product:
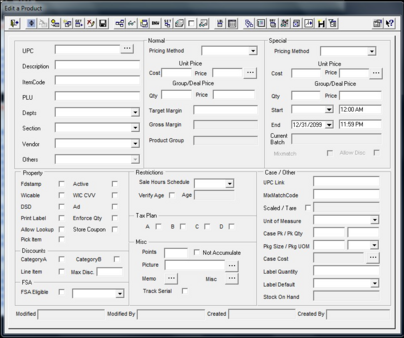
- From the Point of Sale Menu, select the Product Maintenance task. The screen defaults to the Edit a Product Edit_a_Productform.
- To switch to the Add a Product form press the Add a Product button in the toolbar.
- Enter the product’s UPCUPC_code in the UPC field and the product’s description in the DescriptionDescription_of_Product field.
- Enter the product’s Item CodeProduct_Item_Code in the Item Code field if applicable.
- Click on the DepartmentsProduct_Depts drop-down menu to select a department for the product. The product will pickup up the department attributes set up in the Department Maintenance task.
- Click on the SectionProduct_Section drop-down menu to select the section within the department for the product. Sections are optional.
- Click on the VendorProduct_Vendor drop-down menu to select the vendor for this product.
- The OthersOthers field displays a list of user-defined categories, such as Product Groups in the drop-down box. This list is for display only. To add this product to a group, or create a new group, click on the Product Groups button in the toolbar.
- Enter the Normal Pricing Normal_Pricinginformation by first selecting the Pricing MethodPricing_Method for this product. The Gross MarginGross_Margin will be displayed.
- Gross Margin: The Gross Margin Percent (GM%) field displays the gross margin percentage for a product once you have entered the normal cost and price for the product. The Gross Margin Percent is calculated as follows: Price Minus Cost divided by Price. See also: Cost Calculator.
- Fill in the suggested Target MarginTarget_Margin (optional).
- Fill in the Product Attributes.Product_Attributes
- Press the Save button in the toolbar or use the Clone button from the toolbar for entering several like products. The Clone allows the next product to clone all the attributes from the previous product except UPC and item code.
The following additional functions can be performed via the toolbar:
- Click on the Product GroupProduct_Groups button to create a new Product Group or assign the product to an existing Product Group.
- Click on the Pricing LevelsPricing_Levels button to assign pricing levels.
- Click on the Additional Vendors Additional_Vendorsbutton to assign additional vendors.
- Click on the Inventory Inventorybutton to enter inventory information.
- Click on the Deal Dealbutton to establish Allowances or Bill Backs for the selected product.
- Click on the Product Kits Kit_Itemsbutton to set up a product to be sold as a kit.
- Click on the Product Info Product_Informationbutton to enter additional information about the product.
- Click on the Maintain Seafood COOL Maintain_Seafood_COOL(Country Of Origin Label) button to enter seafood’s place of origin and production method.
- Click on the Scale Data Scale_Maintenancebutton to add items to the Scale interface, and to add or edit pricing and label information that will be printed from the scales.
- Click on the Power Edit Power_Editbutton to quickly edit user-configurable groups of products.
Tip: You can print Labels from this form by clicking the Print Labels button. When you exit the Print Labels Report screen, you have the option of clearing the labels. Use the Export Labels Export_Labelsbutton from the toolbar to export the labels to an outside label program.
For Products added via the Front End use the Get Pending ProductsGet_all_Pending_Products task in the Toolbar to set product attributes.
See Also: